Well we're making progress on our laundry room, slowly but surely. We recently finished the shelves and I had fun the other night styling them, particularly because we built in a supporting chalkboard wall:
I've always appreciated The Nester's clever rendition of fake brick on her living room fireplace, so I thought I'd try the same effect over our shelves. The look ended up tickling me to no end, even if there's really no reason real brick would ever be there.
But I can hardly let the chalkboard wall steal the show. The shelves themselves gave the hubby and I a run for our money, but we both admit the final result was well worth the extra effort.
First of all, even with a local Lowe's and Home Depot, we found it difficult to find suitable shelf brackets that gave us the look we envisioned. I wanted wooden, decorative, chunky brackets. What we found were skimpy, metal, weak brackets. Finally we came across a pine version that we believed we could tweak. just. so.
We stood there in the Lowe's aisle for quite some time holding up trim pieces and baseboard and decorative molding to our pine brackets, trying to decide how to dress them to look chunkier. To be cooler. Finally, our selections in hand, we paid & headed home to begin piecing them together.
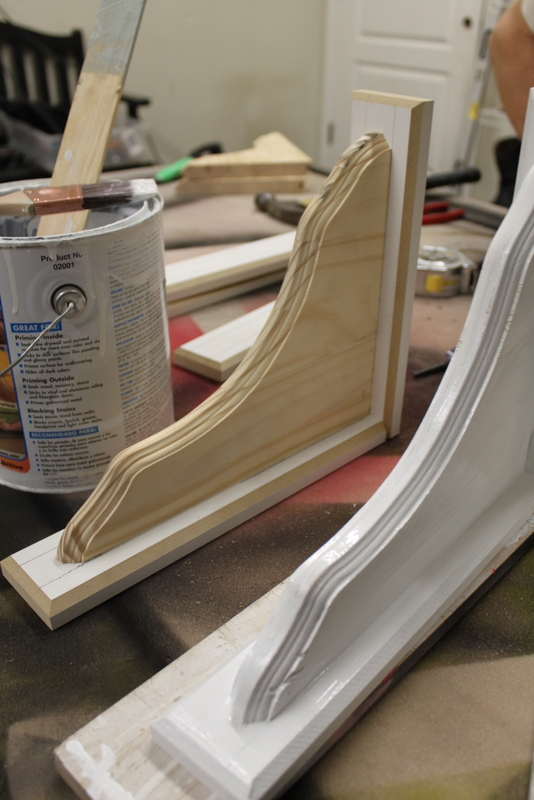
You can see the unfinished original pine bracket under Greg's hand below. Here he is attaching basic 2" molding to create an "L" behind the bracket. (When he first attached the molding, I knew it still wasn't quite right, so I asked if he could miter the edges of the molding a bit to give it a more finished look. He agreed, so that is the tannish color on the edges of the molding. We opted not to 45 the joints of the two boards since the overhang wouldn't be that obvious with 16" deep shelves.)
The next step, once the two pieces of molding were attached, was to prime and paint all six brackets. This, of course, was my job.
Because our wall studs in the laundry room did not fall in correct alignment to support where we wanted our brackets, Greg opted to cut a piece of plywood and attach it to the wall as a ledger board to support our shelves. Which is when it occurred to me to paint the plywood with a chalkboard finish. The woodgrain showed through more than we anticipated, but the more I looked at it, the more I liked its faux bois effect. (Don't you love how I do that? Turn potential disappointment into something with a French name?)
Next, we laid out the painted plywood on the garage floor to measure placement for the brackets since Greg intended to attach the brackets before screwing the plywood into the laundry room wall.
Perfect.
I should also mention a detail we added to the front of the shelves themselves to get the chunky look we were going for. To the front of a regular 16" deep mdf shelf, we used a brad nailer to attach a piece of decorative molding (I believe it was a 2 1/2" baseboard) which I then painted white after filling in the nail holes with putty. This simple, inexpensive step made a huge difference in the overall look, taking the shelves from ordinary to something special.
The first piece of plywood would not hold any brackets at all (what on earth would I store so high up there anyway?), so Greg hung this one first (after using a jigsaw to cut a hole for the vent.) Amaya and I couldn't resist trying out our new chalkboard, leaving messages to surprise our favorite DIYer when he returned with plywood #2.
Finally, the second piece of plywood went up, complete with brackets already in place. I used a black Sharpie marker to cover up the screws. If you haven't discovered the usefulness of a black Sharpie marker, go out and buy one right now. It is an essential home tool.
Final step? Placing shelves on top of brackets, adding a little decor & storage, and playing around with chalkboard art.
Voila!
How nice to bring my extra large saucepan, roasting pan, bread machine, and beverage server from the downstairs pantry to this room just off the kitchen. Much more convenient. I've also made this space my grain storage/grinding station to keep extra clutter and mess out of my kitchen, still leaving a portion of the counter for family members' laundry hampers during laundry day.
Here is the space before:
And now after:
I also made a cute little skirt for the beauty-starved utility sink out of this happy fabric. A few more finishing touches and the room should be almost complete....and oh, so much nicer!
May His peace rule in your home this week ~
Jaimee
Labels: Laundry Room, Shelving